Tuesday, November 6, 2012

Prince Luke's Royal 1st Birthday

This was such an adorable theme to plan - My Godson's 1st Little Prince Birthday party!  Luke's mom knew she wanted a Prince themed birthday for her son's 1st birthday.  This will probably sound like the funniest thing to some - a napkin was what kicked off the design for this theme. It wasn't just any napkin, it was a beautiful black/white damask crown print napkin that Luke's mom had to have.  I don't think I captured a good picture of it but you'll see a glimpse of it later on this post.

That gave me enough to go on the search for an invite, which of course had to include black and white, yet still contain some fun colors since this was a kids birthday party...  and I found it!  Where else?  Etsy of course!

Brooke from Beenesprout beenesprout on Etsy created this awesome design!  The yellow and blue hues added a fun element to the black and white design.


I created this sign to hang on the door.  My favorite part of this sign was the royal number 1 with a crown on it.  Brooke from Beenesprout came up with the super cute Royal 1 design on the printables she designed, which you'll get to see later.  And here you see the Royal 1 again as part of the back drop for the cake table!!  Too adorable not to carry throughout the entire party - ohhhh these are those moments that just bring pure Bliss!


Table before all the goodies were added.  Banner made with Pretty Pennants Cricut catridge.
 Cake table included cake pops, mini cupcakes and an assortment of popcorn.  The birthday boy's banner adorned the table front.  I made the banner with damask print and yellow and turquoise colored paper.


Isn't this cake majestic?!  Jen's cakes did an amazing job yet again.  I'm a huge believer in the cake being one of the focal points of any party.  This cake definitely was!


Mini cupcakes embellished with gold crowns and treat bags labeled with two different designs matched the invite.  There's that royal 1 again...


And now the reveal of the Prince's Birthday throne - Tadaa!!  I still remember the day I got the vision of converting Luke's highchair into a throne with a backdrop where he would be the focus.  I shared my thoughts with Luke's mom and we ran with the idea.  The throne was framed with tulle and a large crown wall decal that gave it the perfect touch.


Close up of the highchair birthday throne made by Luke's mommy.  If you look at the back of the chair she added a cloak to the back - wasn't that brilliant.  A royal carpet sat in front of the high chair  as well to complete the Prince's throne.


Centerpieces made with these gorgeous fabric wrapped damask boxes I found at TJ Maxx.  I saw them and had to buy them!  Didn't know how I would incorporate them into the centerpieces when I got them but knew I had to make them work.  And they did! 

I created two different tags for each side of the box using the Cricut princess party cartridge.  It included a few crown designs which is what I used for the background image.  I personalized the tags with a number 1 and Prince Luke to tie in with the theme.  We then topped each box with gold crowns and had balloon bouquets coming out of each one.  The balloons gave the room a fun and festive feel.


Here's a slight glimpse of the napkin that I mentioned earlier - can you see the crown?  If you look really hard you'll find it...


The party favors were treat bags filled with chocolate.  The tags were made to match the invite design as well.  Super cute!


Sunday, September 2, 2012

Kylie's Under the Sea Birthday

Today I'm sharing an Uber-Special party that we had for my BEAUTY-ful niece/goddaughter Kylie.  It was her 9th birthday and she wanted an Under the Sea themed party.  Her favorite color is blue so this theme tied in well with her favorite colors. 

We started off with Starfish invites.  I created the invitations using the Life is a Beach cartridge on the Cricut.


Love the clever wording on the invite!

Back view of the invitation
The party was held at my sister's house.  She has a garage behind her house that she cleared to create the Under the Sea themed room.  I made a sign that said Kylie's Sea Palace which was posted outside the garage's entry way. It sat on top of a fishing net that spread above the entry way.


Here's our vision brought to life!  Backdrop created with turquoise and aqua tulle.  Lanterns in ivory and turquoise.


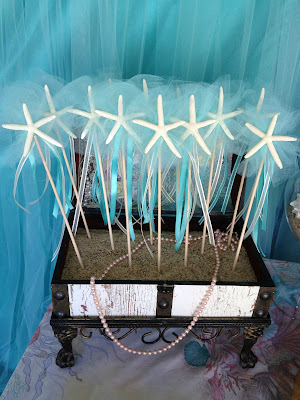
Party favors for the girls were Starfish Wands that my sister and I made.  They were displayed in the fabulous transformed treasure chest I shared on an earlier post.  The treasure chest was filled with sand, shells, strands of pearls and gems. 


The other edible party favor for the girls were treat boxes I made using the Sweet Tooth Boxes cartridge on the Cricut.  I embellished them with flowers and shells.  These mermaid bites consisted of cupcake flavored goldfish (yes, the goldfish crackers that are normally cheese flavored now come in a variety of flavors) as well as sand dollar, starfish and fish shaped sugar cookies.


Party favors for the boys were pirates treasure boxes filled with gummy worm fish bait, gold coins and an eye patch.


Other treats on the table were mini cupcakes adorned with a variety of edible shells and oysters with pearls.


Made out of Madeleine's by MelieMel's cakes

The highlight of the party was the sandcastle cake made by Melanie of MelieMel's cakes.  The cake sat on stacked mini crates I decorated with burlap, chiffon ruffles and starfish.


Apothecary jars filled with sand and seashells sat on each side of the cake.  Apothecary jars always add a beautiful touch!


Centerpieces we used for the guest tables were galvanized pails found at Target's $1 bin.  We made two variations of these centerpieces.  Both center pails were filled with sand and sea shells.  The first set was labeled Sea Food and paired with pails that were filled with gummy fish and golfish crackers.


The second set was labeled Fish Bait and was paired with pails containing gummy worms and cheese puffs.


Our Sea Princess Kylie enjoying her party in her pretty vintage lace romper!


The best part as always - our guest of honor with a huge smile.  She was cheesing after enjoying the water slide her mom brought in for her party.  Kylie and her friends sure had a splash of a day!


Friday, August 31, 2012

A Treasure Found!

Literally!  A fabulous find - treasure chest found at a flea market for $5!!  Yes $5 bucks!  How awesome is that?!?  My sister was on the hunt for nifty little finds as we prepared to plan my niece's Under the Sea themed birthday party.  She happened to be out at a flea market when she stumbled upon this beautiful treasure piece - a "treasure" literally.


This is the not so pretty BEFORE  picture, bought "as is".

Who would have ever thought that this could be transformed into an eye catching treasure chest?  I think so many of us would have quickly walked passed this little ugly duckling...  I'm so glad my sister did not!  She knew we could use it as part of the decor at the upcoming party we would soon be planning.


The beginning of the transformation began by stripping the whole chest.  Once it was stripped, we started to resurface it.  And how did we do that, you might ask.  Paint was not involved here.  No siree...  This gorgeous distressed cream surface is paperstock.  Yes sir!  The stars must have been aligned when we went to our local craft store because my sister bought the chest with the thought of giving it a vintage look.  As we walked down the paperstock aisle it was our good fortune or her good fortune I should say, she found this gorgeous paper in the middle of the loads of paper that sat up the aisle.  She showed it to me and we both were like OMG, that's it, perfect!


Tadaa!  This was the final product.

A close up of the distressed effect on the paperstock.


We didn't stop there.  We then moved into the interior - here's a before of the inside.

This is the  inside of the treasure chest once we embellished it.  We used paperstock, lace, chiffon flowers and adhesive pearls and rhinestones.  The dowels and ribbon laying in the chest are a sneak peak of a special favor we put together for all the little girls coming to the upcoming party.

That's it folks!  Hope you enjoyed this repurposed treasure chest project.  Stay tuned to see how we used it in the next event...

Friday, July 6, 2012

A Safari Party Expedition


I'm playing catch up again!  This was a small Safari themed party held at "The Jungle", a fun and adventurous party place for the kiddos.  Giovanni's the star of our little parties on this page.  Here we are on birthday #2 already. 

My sister, his mommy, found this awesome invite on Etsy, one of my favorite places in the world! 

Passport to the birthday party

Inside of the invite made to replicate a real passport.
My DIY contribution to this party - Canvas prints to sit on the cake table

The finished product - one of two
The cake table covered in burlap and wrapped with a grass table skirt

Cake made by MelieMel's cakes and animal cookie treat bags


Elephant cake topper for Jojo's 2nd birthday
Tags matching party theme - Thank you for coming party animals!
Close up of the Elephant canvas painting

Close up of the lion canvas painting
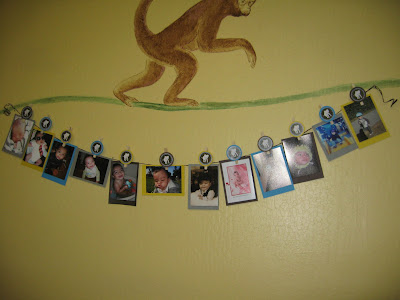
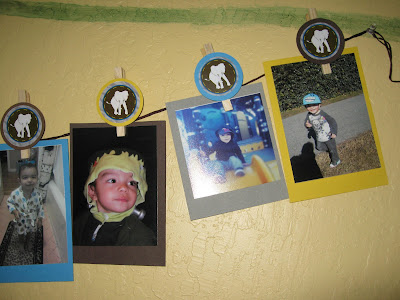
Photo banner of Jojo over the past two years - created by me. Clothespins held pictures


I just love good buys! Found these masks in the $1 bin at Target, these were perfect for this party!

The kids loved them


Jojo blowing out his candles


Look at that Jungle warrior!